


This guide will give you the easiest ways to align layers in Photoshop.
I’ve been using Adobe Photoshop for many years and I have to say, aligning layers is something I end up needing to do regularly.
Aligning layers helps you to get the components of a design or images straight.
And, it’s not difficult to do once you know how!
Let’s dive into the tutorial so you can learn how to do it.

Download a free copy of Adobe Photoshop to follow along with this simple tutorial.
Table of Contents
How to Align Layers in Photoshop in 2 Easy Steps
Aligning components of an image is important when you want a design to have a professional look.
It’s not always possible for us to see when a layer is out of alignment by a few millimeters.
Luckily, Photoshop has some handy tricks to easily get layers into exact alignment.
How to Auto-Align Layers
This method will automatically snap selected layers into position.
This method gives you an instant, precise result in six different positions.
Let’s see how.
Step 1 – Select all Layers
The first step is to select all the layers you wish to align.
To do this, hold down the Shift key and click on the icon of each layer in the Layers panel.
When the layer turns from dark grey to light grey, it represents that it has been selected.
If you want to select all layers, head to the top menu bar and choose Layers > All Layers.

All the layers will now be selected and ready to align.
Step 2 – Align Layers
head to the top menu bar and select Layers > Align.

(Note that if it’s impossible to select Align, it will be because no more than one layer is active in the Layers panel. You’ll need to go back to step 1 and select more layers.)
When you click Align, a pop-out menu will appear. From here, you will be given six choices.
You can align the layers to the Top Edges, Vertical Centers, Bottom Edges, Left Edges, Horizontal Centers, or Right Edges.
Below is the image before the layers were aligned to the top edges.

The following image is how the layers look after Top Edges has been clicked as an alignment choice.
As you can see, the layers will be precisely aligned to the topmost layer, in this case, the square.

The image below shows the shape layers before they are moved. In this case, only the square and the ellipse are selected.

The alignment Vertical Center is chosen, and only the square and circle are snapped to align in the center of the canvas.

The image below shows the shapes before the alignment selection.

The triangle and ellipse shapes are selected, and from the main menu bar, Align > Horizontal Centers is clicked.
As you can see in the image below, the shapes are snapped into a central position, which is between their former positions. They are not aligned to the centre of the canvas.

This is a handy two-click editing trick to know when you need to snap layers into alignment when creating designs.
Now, you won’t have to whip out Photoshop’s rulers and grids and count millimeters to align layers.
How to Align Layers Using the Move tool
You can also use the Move tool’s options tab to align layers.
Click on the Move tool in the toolbar, and its options bar will appear over the canvas workspace.
When aligning layers, make sure that layer is chosen, not groups.
![]()
Tick the box beside Show Transformation Controls, and a bounding box will appear in the canvas workspace around the selected layers.
![]()
The bounding box can be a helpful indicator of which boxes are selected.
As you can see in the image below, the triangle and the ellipse’s layers are active, and the bounding box is placed around them, excluding the square.
This indicates that only the triangle and the ellipse will be moved.

When the square is activated in the layers panel, the bounding box will automatically include it.

When an alignment choice is selected, the shapes will be repositioned inside the bounding box.
Click one of the alignment icons to align the shape layers.
![]()
The first icon will align the shapes to the left side of the bounding box. The second will align them to the middle of the bounding box, and so on.
If you wish to align the layers within the canvas and not within the bounding box:
Click the three-dot icon in the Move tool’s options panel.
This will open a dialogue window.
Click on the arrow beside Selection at the bottom of the dialogue window.
A dropdown menu will appear. Change the choice from Selection to Canvas.

The layers will now be aligned to the boundaries of the canvas.
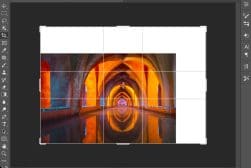
Below, we can see that the images are ready to be aligned, and all the shapes’ layers have been selected.

The image below shows how the shapes are aligned when the second icon, the central align icon, is clicked.

The next image shows how the shapes are realigned using the same icon, but when Canvas has been selected.

The shapes are now aligned centrally to the canvas.
In the image below, all the shapes are selected and Canvas has been activated.

The seventh icon has been clicked, the Bottom Edges icon, and all the shapes have been aligned to the bottom of the canvas.

The Move tool’s options tab has the option to distribute the layers within the alignment.
Click on the three-dot icon and open the dialogue window. You will find the Distribute icons in the second box.

Click on any of the Distribute icons to align the layers in the canvas workspace.
Using the above methods, you can align any kind of layer, including text and image layers.
- Related: How to Blend Layers in Photoshop
Aligning Layers Free Hand
The following method will guide you when aligning layers in Photoshop freestyle.
Step 1 – Select Smart Guides
First, we will turn on the Smart Guides.
Head to the main menu bar and select View > Show.
In the pop-out menu that appears, check to see if there is a tick beside Smart Guides.
If there is no tick, click on Smart Guides to activate it.

Step 2 – Select the Move Tool
From the toolbar, select the Move tool.
When the Move tool and the Smart Guides are active, guiding lines and distances will appear as you move a layer.

When a layer is in alignment centrally with another layer or within the center of a canvas, a line will appear to demonstrate this.
As shown in the image below, the purple vertical line appears to show that the shapes are centrally aligned.

This will help you to easily align your layers into the position you want.
Activate Alignment Guide Lines
When the layers are stationary, you can activate guiding lines.
Hold down Command (for Macs) or Ctrl (for Windows).
Hover your cursor over one of the layers which is not active in the Layers panel.
The triangle layer is selected in the image below, and the cursor is hovered over the ellipse. Photoshop indicates how far the layers are from each other.

The Move tool and Smart Guides will help you achieve the perfect alignment.
Happy editing, and have fun aligning layers in Photoshop!
If you liked this tutorial, you might enjoy – How to Focus Stack in Photoshop.
FAQ
How do I evenly align in Photoshop?
To evenly align in Photoshop, activate the grids. Then, you can use the move tool to align the objects.
Alternatively, select the layers you wish to align and click one of the align icons in the Move tool’s options bar.
How do I arrange layers in Photoshop?
To arrange layers in Photoshop, click on the layer you wish to move and drag the layer up or down the Layer panel into position.
Why won’t Photoshop allow me to auto-align layers?
One possible reason why Photoshop won’t allow you to auto-align layers is that the layers have been converted into smart objects.
Smart objects are non-destructive, and therefore, not all editing actions can be performed on them.
How do you adjust multiple layers in Photoshop?
To adjust multiple layers in Photoshop, you can group them in a group.
To do this, click the folder icon at the bottom of the Layers panel.
When the folder appears, drag the layers you wish to adjust together into the folder.
 How to Use Photoshop Smart Objects in 2024: Create, Edit & Fix
 How to Merge & Flatten Images in Photoshop
 How to Change Canvas Size in Photoshop
 How to Crop Layers in Photoshop (2 Quick Methods)
 How to Center Text in Photoshop (Within Canvas or Selection)
 How to Round Corners in Photoshop (Shapes & Photos)
WELCOME TO SHOTKIT
Enter your email to be sent
today's Welcome Gift:
19 Photography Tools
🔥 Popular NOW:

Shotkit may earn a commission on affiliate links. Learn more.